Wednesday, May 28, 2014

WIP Wednesday...

It feels a bit like I’m living in the land of Quilt OCD over here.  Over the past few weeks I’ve been trying to finish off two big projects at once while simultaneously starting to dip my toes into dressmaking for grownups.  But the quilts…the quilts!

After finishing up my tilted star alphabet quilt top, I knew exactly how I wanted to quilt it with a mix of free motioning quilting and hand quilting.  I love this top and have never tried to free motion on anything larger than a quilt sandwich before, so I knew that I couldn’t dive right into it without practicing on something first.  My main fear about free motion quilting is that I’m so green with it, I don’t want to totally screw up a quilt top for the sake of practice.  What do to??


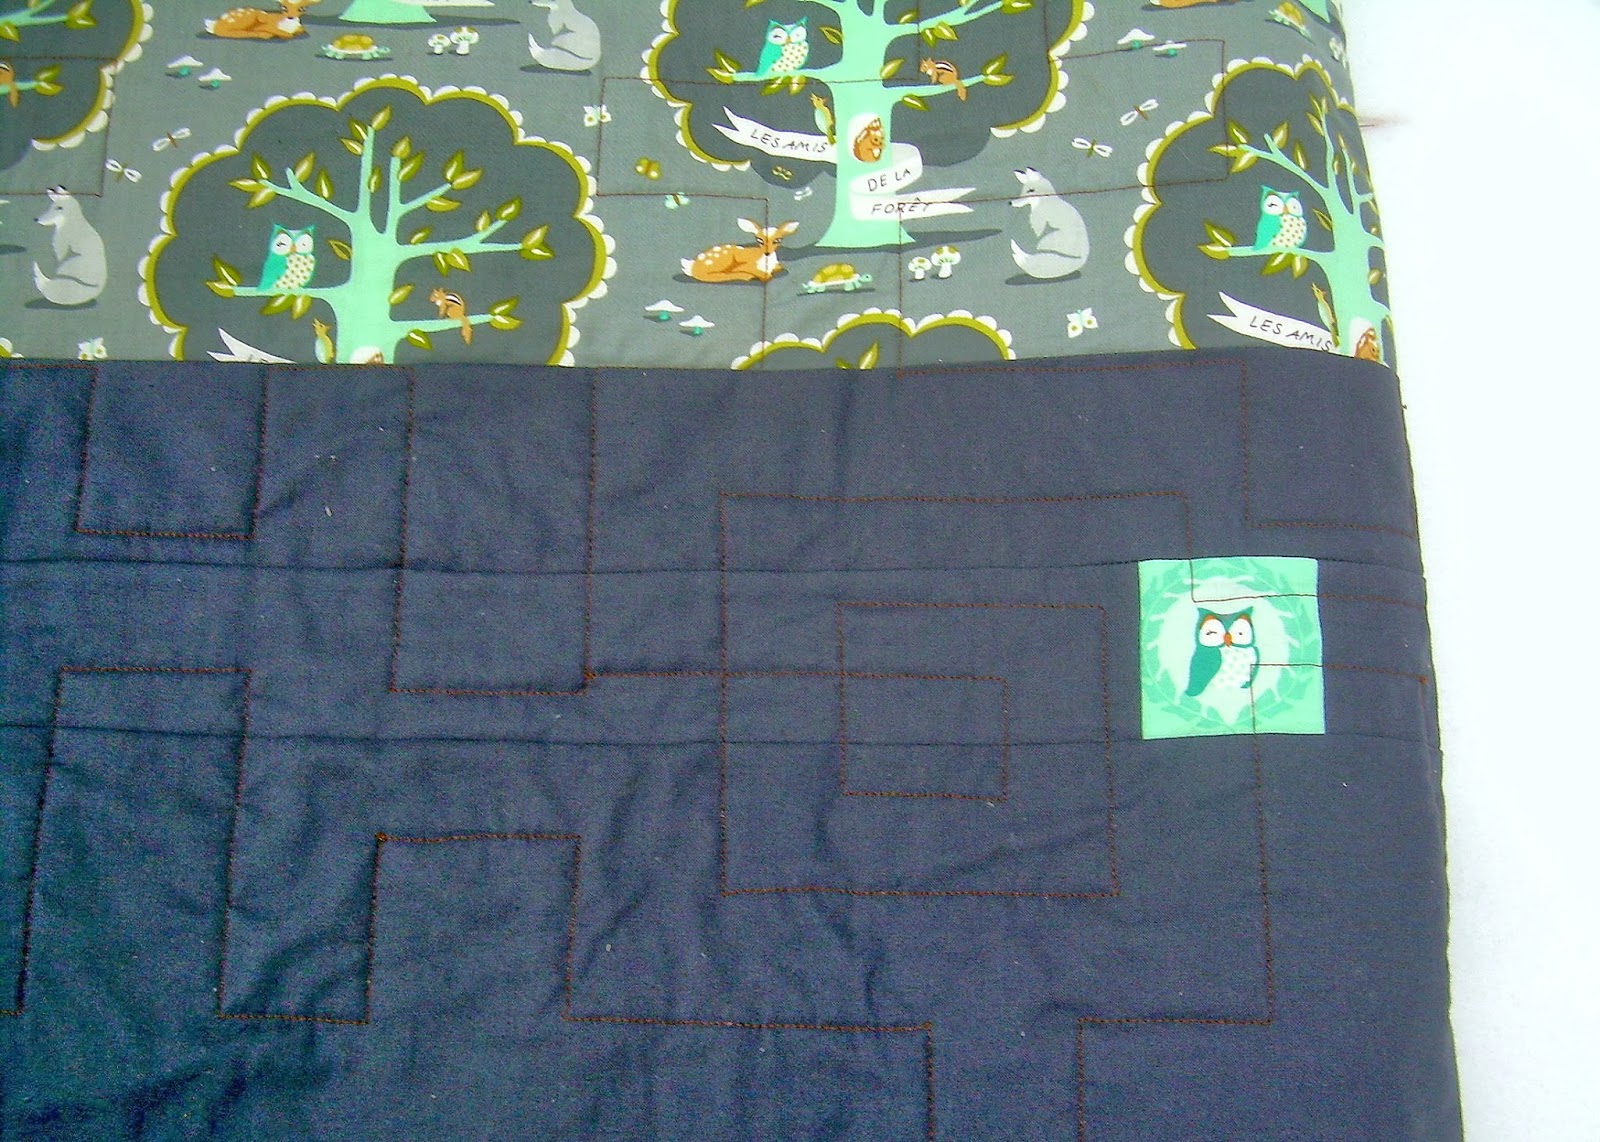
So I dipped into the WIP pile and came across this – my black and white broken herringbone top.  I was in a rush to finish it to participate in the MSBHQAL a while back with the intention of adding an extra column and 2 rows to make it more lap sized.  As it stands right now, it’s more of a generous crib size.  Somehow making the extra blocks just fell to the side as I worked on the feather top, Little One, Mon Amie, and other assorted projects in the past 6 months.  I still really like it as a quilt top, but I have to say that I’m a little more in love with the individual quilt blocks than the top as a whole.  Has that ever happened to you?  Long story short – it’s a finished quilt top that I’m not super invested in and already had backing fabric for.  Hello practice quilt top! 


Months ago, I signed up for Elizabeth Dackson’s FMQ Craftsy class and am just now getting around to watching the videos.  They are fantastic - it's really helpful to see how she's moving the fabric around instead of just reading a tutorial online.

Generic darning foot on the left and the BigFoot on the right
When I first attempted FMQing with my On the Boardwalk mini, I bought a BigFoot for my machine and really struggled.  I found that the large plastic disk really obstructed my view of where  I should be going and it felt like I was trying to quilt blind.  Seems like you should be able to clearly see through the plastic, but maybe there was glare from the machine's light?  I don't know but it just wasn't working for me.  I went out and purchased a generic darning foot which looks more like what I’ve seen Elizabeth use in her videos and boy did it make a big difference! I feel like I can really see what I'm doing now.


I’m still struggling with matching the speed from my foot pedal with moving the fabric around, but I feel like I’m getting a better handle on things as I work through this one!  My plan is to keep it simple stupid and just move back and forth through each block with curliques in the black and white sections.  It’s still looking pretty sloppy, but I think I’m getting better!  Once I make my way through the black and white quilt, I’ll feel more confident to try something only slightly more difficult on the tilted stars.  

Linking up:  
WIP Wednesday at Freshly Pieced


Wednesday, May 21, 2014

Blogger's Quilt Festival: Mon Amie

My Mon Amie quilt is the second entry for the spring Bloggers Quilt Festival hosted by Amy's Creative Side.


I created this quilt for a friend who asked for "some kind of an owl quilt." I brought in a stack of my "modern" quilt magazines with a few post-it notes here and there and let her peruse.  To my delight, she landed on a pattern that I had been wanting to try - Rangoon created by Gudrun Erla which appears in the Jan/Feb 2013 issue of Quilty Magazine.


As an added stroke of sewendipity, a few days after we started talking about our plan of attack, I saw a snippet of fabric in a quilt during a guild show and tell that was part of the Les Amis collection for Michael Miller fabrics.  It was perfect!  But in addition to the Les Amis line, some prints from the Backyard Baby line caught my eye too - and the two collections really play nicely together!  I filled out the purchased fabric with a few more from my stash and everything came together fabulous.


The rangoon blocks looked fantastic and presented a new (to me) challenge of partial seams.  I was really nervous to start with but once I got one block under my belt, it seemed like I was so worried for nothing!  The finished quilt took a little longer than I was hoping for - mostly from my own stops and starts and cramming too many projects into a few months time - but I'm so happy with how it came out.  These Amis are too cute and are definitely going to be loved and snuggled with in their new home.  


I went fairly simple with the quilting.  I used a chocolate brown thread and did a close outline of all the rangoon sticks and then went back through and filled in all the middle and border space with some chain squares.  It melts nicely into the background on the front and is still pretty subtle on the back.


 I used another Backyard Baby fabric for the binding.  The white background and multicolored cool dots worked so well for both the front and back of the quilt!


This quilt finished out at 58" x 70" - a great size for snuggling on the couch while lounging in front of the fireplace!  While you still have time, link up and check out all the other entries over at Amy's Creative Side.  Entries and nominations for Viewer's Choice ends on the 23rd and voting begins on the 24th.

AmysCreativeSide.com

Tuesday, May 20, 2014

Blogger's Quilt Festival: Riley's Showstopper

I hemmed and hawed about which quilts to submit for the spring Bloggers Quilt Festival hosted by Amy's Creative Side.  I actually missed out on the fun last fall, but didn't go too far back in the quilt vault for my entries.  Of course, it doesn't help that I've got a couple quilt tops just hanging out and waiting to be finished, but I suppose that just makes it more likely that I'll participate in the next round!

Most of this content is from the original post, so sorry for the repeats for my previous followers:


I finally put the last few stitches in the binding for my Riley Blake challenge quilt yesterday.  It's no secret that I really struggled with trying to figure out how to use these fabrics.  But on the day that I made myself sit down and figure something out, I took out my entire stash of solids to play around with.


Once I placed the orange circle print with the magenta and placed the chevron print (which I had previously been thinking was more blue) in with the aqua and turquoise, it all made sense and clicked into place for me.  Rainbow, of course!!  So now what to do with them?


In the comments for my Stumped post, someone suggested that I limit myself to using something I already had instead of searching for some brand new project to try.  Awesome idea!  I went to my list of patterns that had been collected but not used and came across the Showstopper pattern by Don't Call Me Betsy.  When she released this paper pieced pattern, I fell in love and bought it immediately but wasn't sure when I'd get the chance to use it.  At 96 pieces per block, it's by far the most complex paper pieced block I've tried and I can't really imagine making an entire quilt from it.  A mini works perfectly.  Each block is 12" finished, so this mini ended up at 24" square.


Elizabeth is a genius - all the secondary shapes that this pattern makes really keeps your eye moving all over the mini.


I really liked getting to make the prints the focal points of the blocks while all the solids keep those shapes so crisp and sharp!


The spiral quilting from my Brightly Broken mini made another appearance here.  Instead of white thread, I actually used a light lavender.


It doesn't show up too well in the photos, but in person I think it adds a little extra interest.


The only fabric from the challenge bundle that I didn't use was the grey and white stripe.  I would have used it for the binding, but knew that I would run short.  Instead, I used more of the charcoal grey solid and threw in a few bias strips from my print scraps.  I really like the effect of those bonus pops of color around the edges!


So if you've managed to bear with me, come and check out all the other entries over at Amy's Creative Side.  They are amazing and you will more than likely come away with another blog (or five) to follow.  I'll be posting my second entry tomorrow, but in the meantime happy browsing!

AmysCreativeSide.com

Monday, May 19, 2014

Another Rainbow Quilt...


I gave you a sneek peek of my finished tilted stars rainbow top in my giveaway post from last week, but here it is, finished and positively gorgeous in all its glory!


As I mentioned before, I started by making two blocks just before our guild retreat in March, made 14 all at once during the retreat weekend, and then tried to finish a couple blocks a week until they were finished.  I got them all pieced and pressed by the middle of April and then (sadly) just let them sit in their project box until last week.  Almost immediately after I finished all 27 blocks, I started to piece the first row and then immediately got disgruntled...any guesses why?


The problem areas were where three star points were intersecting at once.  (Side note:  if I hadn't set these blocks slightly staggered to get an odd number of blocks in the top, then I would have had 4 star points to fight with - yeesh!).  I felt like I either had seam allowances flipping in the wrong direction through the feed dogs or they simply got stuck right under the needle where those 9 layers of seam allowances were trying to get through at once.

So I got short-tempered after two rows and put them away for a month, only to pick them up again at the beginning of May.  Once I pushed through all of those uber-thick seams, it really didn't take long to completely piece together.  However, I think the top was trying to punish me because in the middle of one row, I didn't see one particularly ill placed pin.  My needle was nice enough to spot it for me, shriek in terror (or maybe that was my machine.  Or me.  Whatever.), and break in half with a little piece flying up and hitting me right below my eye!

I'm pretty sure that I've mentioned somewhere once before that I hate using pins because I have an irrational fear that one will break and hit me in the eye.  Irrational NO MORE my friends!  I typically only use pins while piecing long or heavy strips or where seams need to meet up perfectly. I still will of course, but I'm definitely going to be more vigilant about removing them as they approach the needle.


As I was piecing, I got really, really excited when all the points lined up perfectly...


...and said a few choice words when inexplicably they didn't.  Oh well.


I tried to use a bunch of different blacks for the background and ended up using 14 different fabrics.  The one above I love but am still wondering if it's a little too loud compared to the others.  Not like I'm going to take it out at this point, but I can't make up my mind if it adds interest or is just distracting.  Thoughts?


I think it even looks beautiful when it's all crumpled up on the ground after a windy photo shoot.  It must be love. :)


I do have a definitely plan for quilting this beauty that involves a mix of free motion machine quilting and hand quilting using a variety of variegated perle cottons, so stay tuned as I practice, practice, practice my FMQ skills and ask for advice!


Linking up:
Fresh Poppy Design

Sunday, May 18, 2014

Winner Winner Chicken Dinner...


Wow - that was a lot of entries and a bunch of new followers from the Sew Mama Sew Giveaway post!  Thanks so much for visiting and following along - I hope that you enjoy the quilty ride.  Above is a sneak peek of tomorrow's post, but here's the news you've been waiting for:


From all those comments, people truly do love quilting with a rainbow of colors, but I think that MrsV had the most popular response.  It just so happened that the most popular favorite color to sew with was also a favorite of the random number generator.  So congratulations MrsV!  Check your email and send me your address and I will ship out that lovely pack of fat quarters :)

Friday, May 16, 2014

Sewing Room Swap...

After all the challenges and guild projects that we've completed in the past year, the Boston Modern Quilt Guild decided to throw a Sewing Room Swap so that we could make little gifts to treat each other and prettify our sewing spaces! From our blind signup, I drew Jen of A Quilting Jewel.  The only item on her wishlist was a thread catcher basket that you could hang off a sewing table or ironing board.  No colors were given, but Jen is a big fan of rich jewel tones (hence the blog name :)).


When I went on a bit of a fabric binge during the winter doldrums, I found this super cute Kokka fat quarter that I thought would be novel and charming enough to feature in the swap item.  I pulled a few other jewel tones that popped up in the print to complement it and went searching for a good pattern to use!


I scored big when I found a free tutorial (circa 2009) on Sew Mama Sew by Elizabeth Hartman for a combination pincushion and thread catcher!  As always, her patterns are super easy to follow and always have an impeccable finish.


The pincushion is filled with Polyfill but also weighted down with an inner pocket of rice so that it can sustain the weight of the basket and any accessories that you put in the organizing pocket.  It has a felt strip on the top so that you can easily separate your needles from your pins.


The hanging pocket is sewn right into the bottom of the pincushion and sits perfectly on the top of your ironing board, on your sewing table or even on the arm of a couch if you're doing handwork!  See that little button loop? That's where you can attach your thread catcher if you want it hanging!


Or you can just keep it on your desktop.


Sorry that I couldn't be at the meeting to give it to you in person Jen, but at least I'm glad that you got it before the big swap day!  Hope that you enjoy it and it catches lots of jewelicious scraps! :)

Sunday, May 11, 2014

Lots of Goodness and a Giveaway...

I've been a little lax about posting lately but there is an awful lot of good stuff going on over here!  First of all, remember my enormous feather quilt?


Well I took a leap of faith (and a huge weight off my shoulders) and sent it off to a professional!  This is my first time sending a quilt out to a long-arm quilter, but I couldn't ask for better hands to place it in than award-winning quilter Margaret Gunn.  I cannot wait to see what she does with it - I'm on pins and needles waiting!

I've also finished up a small project for the BMQG Sewing Room Swap.  I can't show you the finished product yet because its currently travelling to its new home, but watch out for the reveal this Friday.  Instead, here's a sneak peek at the fabrics that I pulled...


After rushing to make a sample block for my turn as the ScrapBeeLicious Queen Bee for May, I managed to finish up a second block after I posted the instructions.  The dark purple is hard to photograph, but seeing two blocks put together really shows what the overall pattern will look like.  I am SO in love with these blocks and cannot wait to see what these talented ladies can pull from their scraps!


And finally, lest you think that my tilted star alphabet blocks have been languishing in a box somewhere alone and forgotten...well, you just might be right.  I actually finished all the ABC blocks over a month ago but when I started piecing them together into rows, I saw that where the star points were abutting, the seams were getting pretty thick.  A hazard of paper piecing sometimes, but so frustrating!  So I put it away until I felt like tackling it again...and next week I will have a finished top and (I hope) some quilting in progress to share.


Spoiler?  I actually proved my greatest fear that a broken needle can fly into the air and hit you in the eye.  Okay, near the eye.  But still! Shudder...


And now for the real reason that you might still be reading (but I hope you've had a fun read along the way ;)) is that today is Sew Mama Sew Giveaway Day!!  I am positively drowning in fabric over here and my bins are starting to overflow.  I'd like to giveaway an assortment of 6 fat quarters in a rainbow of colors - because I love a good rainbow quilt and hope that you do too!  There's some Tula Pink, Lizzy House, Thomas Knauer, and a few other Free Spirit fabrics thrown in there - all great names to have in your stash!


Simply leave a comment to let me know what color you love to sew with the MOST and you will be entered to win.  If you want a second chance to win, leave me a comment to let me know how you follow my blog (Feedly, Bloglovin, etc.).  International comments are welcome and I will close the comments on May 16th at 5pm EST.  I'll pick the winner through the good old Random Number Generator on May 18th.

Just a reminder that if you're a no-reply commenter, please leave your email address in your comment so that I can contact you if you win.  Thanks so much and happy commenting!

Friday, May 9, 2014

For An Awesome Teacher...


This week is Teacher Appreciation Week!  Although I still have another small something prepared for the end of school, I wanted to show my daughter's kindergarten teacher how much we appreciate all she does.  I've volunteered a few times and let me tell you that a room full of 5 year olds - even at their best behaved (lol) - is a ridiculous amount of work!  I'm exhausted after an hour, so I don't know how she does it day in and day out.


I've never tried a Noodlehead pattern before but have heard nothing but rave reviews.  Before I dive into the Super Tote, I purchased the much praised Divided Basket pattern in the hopes of making a fabric basket that I could stuff with lots of extra school supplies and goodies. I pulled all my fabrics and cut out pattern pieces on Monday with the goal of finishing by Thursday at the latest.  Within 24 hours, I had a finished basket!


This pattern is awesome!  I had a blast using some novelty cursive fabric as well as a dash of dictionary print for the divider in the middle.  I even managed to sneak in a label :)


I had so much fun making this that I'll definitely be making more.  And just about everything that I bought (except for the sidewalk chalk) fit inside no problem!


On a little side note, I finally caved in to peer pressure and hopped onto Instagram.  I'm instantly hooked - I still love checking everyone's blogs, but it's fun to see projects in progress and bits of everyone's personal lives and kids.  If you're on there, come and find me @simplesewendipity!

Linking up:
Fresh Poppy Design